| I have a 4 inch dredge which I have used for many years at various locations in the California mother lode gold country. A few years ago I changed out my old dredge pump for one with higher capacity - the plan was to get greater suction. It worked, but I noticed a significant drop in my fine gold recovery. I know that the old crash box style dredge sluices are not very good at recovering fine gold, but when you up the water speed too much, well, it really makes things even worse. I knew I had a problem, but while dredging in 2002, noticed a small nugget had worked its way down my sluice to the 6th riffle - it was on its way out of the box. I later weighed it and it came in at 8 grains, so I figured if gold that size could work its way out, my fines recovery was really bad and I needed to do something. I just could not put it off any longer, and I began to consider my options. Mostly because of the cost, I decided to make my own home made sluice box. I did not have any design plans or specific directions, but I am a mining engineer by background, and I own or have access to the necessary metal fabrication equipment, so the project did not seem beyond my reach. Besides, the 49ers designed and made their own sluice boxes, so why couldn't I make my own? I also figured I'd save some money in doing it. | 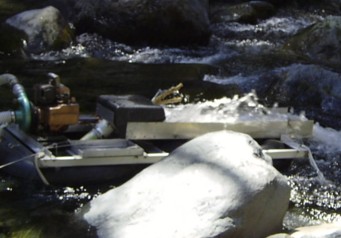 |
|
| TO THOSE WANTING TO BUILD A HAND FED SLUICE, I HAVE A SEPARATE PAGE: HAND SLUICE | Frothing water inside my old crash box sluice | |
|
|
||
| Nearly all portable dredge sluices have Hungarian type
riffles, and I wanted my homemade sluice to have them as well. The concept of the Hungarian riffle (also
called the Lazy L) is that the water and gravel
flow over the riffle and a little eddy sets up behind the riffle. Lighter materials
continue down the box and out, but the heavier material like gold gets caught in the eddy behind the
riffle, settles out and stays in the sluice box. They really are nothing
complex or technical - basically these riffles are just a
short bit if steel bent over at the top. Its nothing too hard to recreate
for yourself, but they are much more efficient than angle iron and some
other types of riffles. In planning
the design for my own box, I took a close look at
sluice boxes of various designs at the local prospector's shop here in Reno.
I also spent some time at a GPAA Gold Prospectors show that was held here in Reno, looking at Keene's
display of all their equipment, with a special eye on how their sluices were
designed.
I decided that a flare and box design with under current riffles for catching find gold would be the best one for me - I knew it would help me capture all the fine gold I could. This is basically what Keene is using on all their new dredges. I first thought about trying to make my own flair, but to do it right would be a lot of work, so I decided to purchase a Keene Flare. They are made out of molded plastic, which is a big part of why I chose to buy one rather than fabricate my own. I suppose you could make a homemade one out of fiberglass, but that would be heavy and a difficult project all in itself. So in purchasing the flair for my project, that meant I would be going with a standard 16 inch sluice width, which I knew would work fine with the rest of my equipment (my equipment was designed for a 16 inch wide box). My old box was 53 inches long, and the new sluice had to be able to work with my existing flotation frame (since I didn't want to build a new frame as well). Because of this, the new box is 54 inches long, 6 inches longer than Keene's standard 3 stage sluice box (for a 4 inch dredge). I spent a couple lunch hours going through local scrap yards, to see what I could acquire for building the box. I came up with a design, based partly on what I knew about sluice box operations, partly on what I'd seen in commercial designs, and partly on what I could get in the scrap yard (or already had on hand in my garage from other projects). By the way, scrap yards are a great way to get materials for metal fabrication projects very cheaply. One of the items I lucked out on was a box made of 3/16th inch diameter punch hole steel. It had been used for the ventilation on some sort of electronics equipment. For me, it would be perfect for the undercurrent screen - just the right size. When I got together all my metal from the salvage yard, in figuring the price, I just paid a couple bucks for all the steel, and only about $10 for the aluminum. |
 |
|
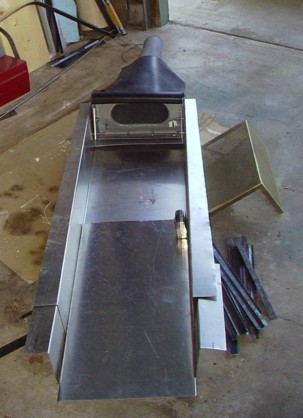
| The 3 stage sluice box - starting construction | ||
| In developing plans for a homemade sluice box, the more
time you spend thinking about your design, the better. You don't want to
have to buy parts you don't need, but on the other hand your slice box need
to catch the gold efficiently. A good plan and a good understanding of how a
sluice box traps gold are important to your design. I think miners moss,
which is not used in nearly all commercial gold dredges, it a real important
item for capturing that fine gold. I went with miners moss under all the
riffles in my sluice.
On the three stage sluice, most of the gold gets caught in the upper part. As the gravel passes down the box, it goes over a screen, which in my sluice has 3/16 inch holes. The fine gravel and smallest gold goes down through the screen into the lower or underneath section of the sluice. There the slower water allows the fine gold to settle out. Material that is not small enough to go in the 3/16 screen goes over an additional section of riffles before it leaves the box. This is a standard type of undercurrent type of design. |
 |
|
|
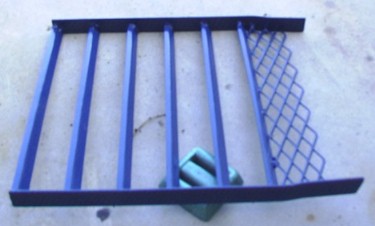
Removable Front Riffle Section |
|
|
||
| A friend of mine has sheet metal shears and a brake. I cut the
sheet steel to size on the shear and I bent the riffles on the brake. They are just like
the standard Keene riffles, a modified Hungarian type. To make them I'd grab about a
quarter inch of the metal and bend the rest up at a 45 degree angle. This is all there is
to the basic hungarian or "lazy L" riffle. If you have access to a sheet
metal bending brake the riffles are nothing to make. The riffles on the first (front) set
are 3/4 inch high, the riffles on the upper deck of the under current are 1 and 1/4
inches, and the lower under current riffles are 3/8 ths of an inch high. I used standard
mild 1/16 th inch steel for all the riffles. The sluice box itself is just a big sheet of
aluminum bent into a trough, and was no big deal. It only took about 2 hours to do all the
shear and brake work (and it only took that long because I was being careful and taking my
time). A project like this really does require tools like the brake and shear, and some sort of welding equipment - It would have been nearly impossible without them. After cutting and bending everything, the next step was to weld up all the steel into the designed configuration. There is a lot of welding to assemble the riffles. Nothing too difficult, just a lot of spot welds. I am sure Keene and the other manufacturers have pre set jigs for making up riffle sets, but I had to make do and set things up for my self. This was by far the most time consuming part of the project. My welds aren't pretty, but they do the job - they just need to be sturdy and hold the riffles in place. I so strongly recommend that you consider buying one of these welders that I have done up a whole web page on it. If you are seriously considering building your own sluice box, check out my page: Low Cost, Small Arc Welders For Home Use
|
 |
|
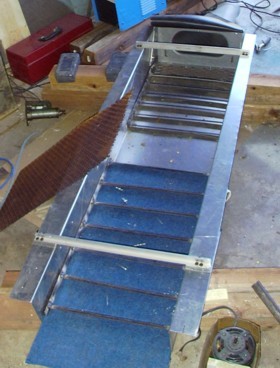
Homemade sluice box Nearing completion |
|
|
| Flat steel strips are welded on the ends of the riffle to hold them in the
proper position. The wider part of the riffle is turned over and set at a 45 degree angle
to the bottom of the sluice. In that position, the narrow bent part is parallel to the
bottom of the sluice box. The third picture shows at set of riffles, all welded up and
painted, ready to put in the sluice box.
Do you have the proper tools? Fabricating your own gold dredge sluice box takes tools. Things like a hack saw, pop rivet gun, drills, wrenches and the like are the minimum. The more tools and fabricating skills you possess, the more likely it is that your home made dredge project will be a success. I have done up a page on hand tools for this type of project, you can check it out at: Mining Project Necessary Tools Finishing the project Modifying the flotation frame Operations |
 |
|
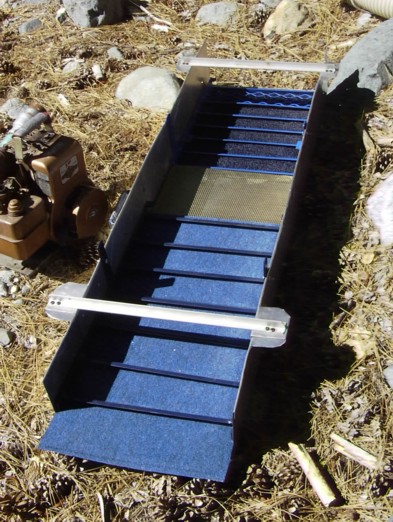
| Finished and Ready to put into Operation | ||
| Performance Report When I cleaned the under current (lower level) riffles, I noted that only a little gold showed up there. There was loads of black sand, and only a little fine gold. Keene advertises that 90% of the visible gold stays in the first set of riffles, and my box performed in a similar way. A slight amount also showed up behind the riffles of the upper deck of the undercurrent sluice, so I put in Miners Moss there. The final clean up showed a very significant increase in fine gold over what I would have previously expected. In my opinion, the first most important thing to improve recovery is to get rid of the crash box. The flare slows down the flow and spreads the material, greatly increasing your gold recovery. Just compare the full white water froth inside the old crash box version and the new sluice box. Its a wonder I got any fine gold at all with my previous set up! The box held together fine, one spot weld broke in the field, but it did not affect the sluice's operation. I'll fix it before I put it away for the year. The revised and elevated motor mount worked just great. |
 |
|
| Finished sluice, on the water & In operation | ||
| For those interested in making their own home made
sluice box in a do it yourself type of project, I can say if you have any
metal fabrication skills, you will find this an easy project. A little
welding, a little metal folding and the project is done. If you are just
making a sluice to shovel gravel into, there is no need to have an underflow
or two level box. In that case, one level is fine. Making your own gold sluice is
a good beginning project for new prospectors in my opinion. Just take a
close look at the sluices being offered by the manufacturers, and you can
make your own plans. On the other hand, if you are making your sluice box for a dredge, then I do recommend the two level or undercurrent type box. It is what Keene, Proline and several other dredge makers are using on their new dredges. I do not have any written plans that I offer, but you can make a plan for yourself easy enough. Just go out and take a good look at a friend's sluice box, or go down to the local prospecting shop and take a close look. You can see how they are made and I think you will find that if you can do a little welding and metal folding, that you will have no problem making a box for yourself. Do use miners moss under your riffles, this stuff makes a big difference in catching fine gold. Here is my summary of the construction costs for my homemade sluice box: Scrap Aluminum:
$10 I think a new dredge sluice box in this size is well over $500. Its funny that the biggest expense was the Miners moss. I really do believe that this stuff makes a big difference in fine gold recovery. Its probably second to the flare in improving the fines recovery. |
 |
Recommended
|
| If you make a sluice box for yourself, I wish you the best of luck with your project. | California Gold dredge Country |
|
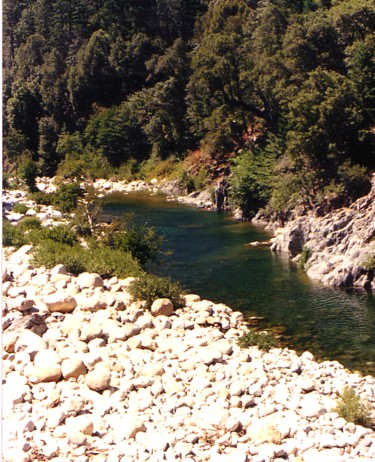
| My first use of this sluice was on my 2003 prospecting trip to Sierra City. For more about that trip and the sluice box, see SIERRA CITY PROSPECTING. | Thanks for checking out my gold mining
adventure. - Chris Ralph |
|
|
|
||

