Build A Do It Yourself,
Home Made
Gold Rocker Box
.
Build A Do It Yourself,
Gold Rocker Box
|
 |
||
|
. |
Have you ever wondered about using a Rocker box to mine gold? Interested in building your own rocker box for gold prospecting and saving some significant money in the process? If you do it right and plan well you really can save a lot of money and still have a good, functional rocker box that is durable and really holds onto the placer gold - and that counts for a lot. Here are some thoughts about the essential tools, components and skills that you need to take a look at when planning out the construction of your own home built gold rocker box...... |
 |
|
| At the very dawn of the Gold rush to California, the
rocker box was perhaps the most used piece of gold prospecting equipment. For a time it
was perhaps even more important that the
gold pan. Mostly this was because the miner could
make a rocker for himself in the field from rough sawn lumber cut in the
forest. They are
also easily portable. Rocker boxes were also popular during the
Klondike gold rush for
working the hillside placers that were far above the creeks.
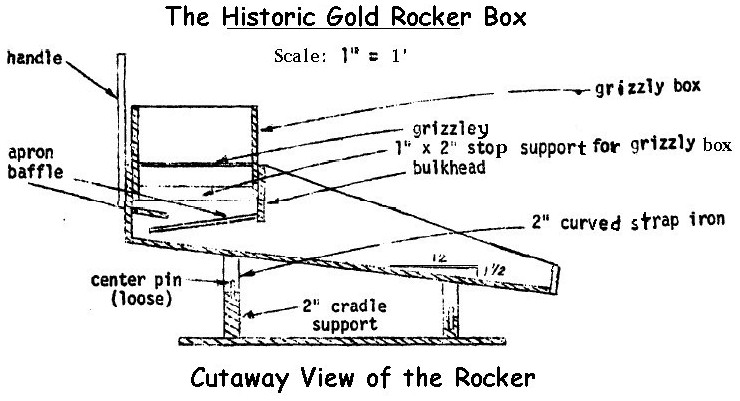
The 'rocker' is a box with a hopper about 3 to 4 ft. long and 1 to 2 ft.
wide, sloped like a cradle, and is mounted on semicircular pieces of wood
and worked by a, handle to give it a side motion; and it is also inclined so
as to carry the material down to the lower end, which is open. At the upper
end is a small hopper that may be removed and which has a sheet-iron bottom
perforated with 1/2 -in. holes. Under the hopper is a canvas apron or tray
inclined toward the head of the box but touching neither end of the
hopper-box. Several wooden riffles are placed across the box. The material
is fed into the hopper and screened through by water poured on top; the
lighter material is carried over the end, while the riffles catch the
gold nuggets and magnetic sand. This concentrate is cleaned out and panned at
the end of the operation. The rocker is used for
the same type of work as the gold pan in that it is mainly a prospecting tool. A man is able to wash 3 to 5 times more yardage than with the
gold pan, and the use of the rocker eliminates much of the backbreaking strain of
continuous panning. On the other hand, the easy mobility of the pan as a prospecting
device is lost. |
||
|
 |
|
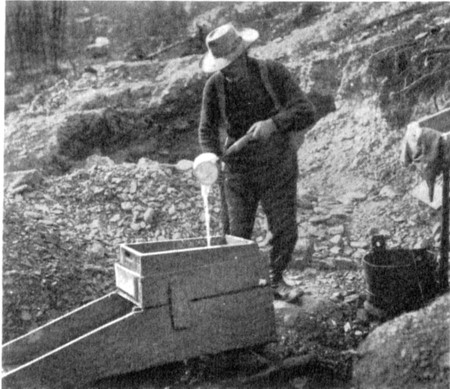
| The
operation of a rocker consists of shoveling gravel onto a screen or grizzly, pouring water
over it from a dipper, and at the same time giving the device a back-and-forth rocking
motion. The grizzly retains all the oversized stones, which are removed by hand when they
have been washed clean. The operator briefly examines the oversize rock to be sure no
large nuggets or gold specimens are being tossed out. The cradle must be placed on
an inclination while being worked, and under the influence of the continued side-to-side
rocking the dirt is quickly disintegrated, passes down through the hopper grizzly and the water and the undersize fall down onto the
canvas apron which saves most of the gold and
places the remainder at the head end of the trough. From the apron it is conveyed
to the inner end of the cradle floor (the sluice box like section of the rocker), from
which it flows over the riffles, or bars, and out at the mouth. Riffles,
canvas, blankets, corduroy, burlap, or cocoa matting with expanded metal have been used to
cover the bottom of the trough and all have met with varying degrees of success in saving
the gold. The combination of cocoa matting covered with expanded metal lath has proven to
be quite effective for most gravels. The frequency of cleaning up depends on the richness
and character of the gravel, but clean-ups are usually necessary two or three times
a day. The hopper is taken off first, then the apron is slid out, and washed in a bucket
or tub containing clean water, and finally the gold is collected with a spoon from behind
the riffle bars, and panned out. The rocking motion used should be sufficient to keep the gravel disturbed, allowing the gold to settle out, but a too vigorous movement will cause a gold loss. The gravel bed should be shifted slightly with each motion and should be evenly distributed across the trough. Generally speaking, the rocker is not known for its ability to save fine gold, but with careful and expert manipulation, decent fine gold recoveries can be achieved. Tailings from both rockers and sluice boxes should be occasionally panned to check for gold losses. When gold is found near the lower end of the rocker or sluice box, the potential for losses should be investigated. |
||
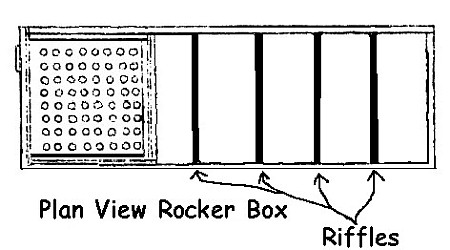
Because there is no one “right”
design for a rocker box, I am not actually presenting specific plans, but I am giving you
the information you need to plan, design and build your own rocker box if that’s what
you decide to do. My recommended design for a
rocker is to start buy building a sluice box 40 inches long, 16 inches wide on the bottom,
sloped like a cradle, and with rockers at each end. The hopper would be 16 inches square
and 6 inches deep, with a sheet metal bottom made of perforated steel with 1/2-inch holes.
This hopper box needs to be designed so it can be removed for clean up. A light
canvas-covered frame is stretched under the hopper, forming a riffle. Square riffles of
wood or steel are placed across the bottom of the sluice portion of the rocker. Curved
feet are placed underneath the sluice portion of the box to allow it to be rocked back and
forth. Historically, rockers are built of wood, as the early prospectors built them.
However, there is no reason that a rocker could not be built from sturdy heavy gauge sheet
aluminum. It would be lighter that the wood version. Remember that wood also absorbs
water, and water logged wood is much heavier than dry wood. |
 |
|
|
|
|
|
Take the time to consider your own plans, review the rocker photos and design drawings on this page and build what is best for you. One design I idea that I did have, which you might consider, is that if it is properly built with a removable hopper, the rocker base could also be used as a simple sluice box in locations where enough water flow is present to run a sluice so long as the hopper and frame as well as the feet are removed first. This type of dual purpose sluice or rocker would work well with a design made from a sheet aluminum body - the turn of a few wing nuts and with a few bolts one could easily go from a sluice to a rocker or vise versa in just a few minutes - there is a lot of similarity between the two types of equipment. If you donít already own a welder, this project might be just the excuse you needed to buy one! I so strongly recommend that you consider buying one of these welders that I have done up a whole web page on it. If you are seriously considering building your own dredge, check out my page. If you are seriously considering building your own rocker or sluice box, check out my page: Low Cost, Small Arc Welders For Home Use The more tools and fabricating skills you possess, the more likely it is that your home made dredge project will be a success. I have done up a page on the hand tools needed for this type of project, you can check it out at: Mining Project Necessary Tools If you would like to view some more information on how to operate a sluice box (including some comments on rockers), be sure to check out my webpage on using one: How To Use A Sluice Box To Find Gold |
||
 |
||
|
||
Want to know a little bit more about this crazy prospector guy? Well, here's a little bit more about me, and how I got into prospecting: Chris' Prospecting Story
Gold Sluice, Gold prospecting, home made gold sluice, gold sluice design, gold sluice plans, building a gold sluice, gold sluice riffles, build your own sluice box,